
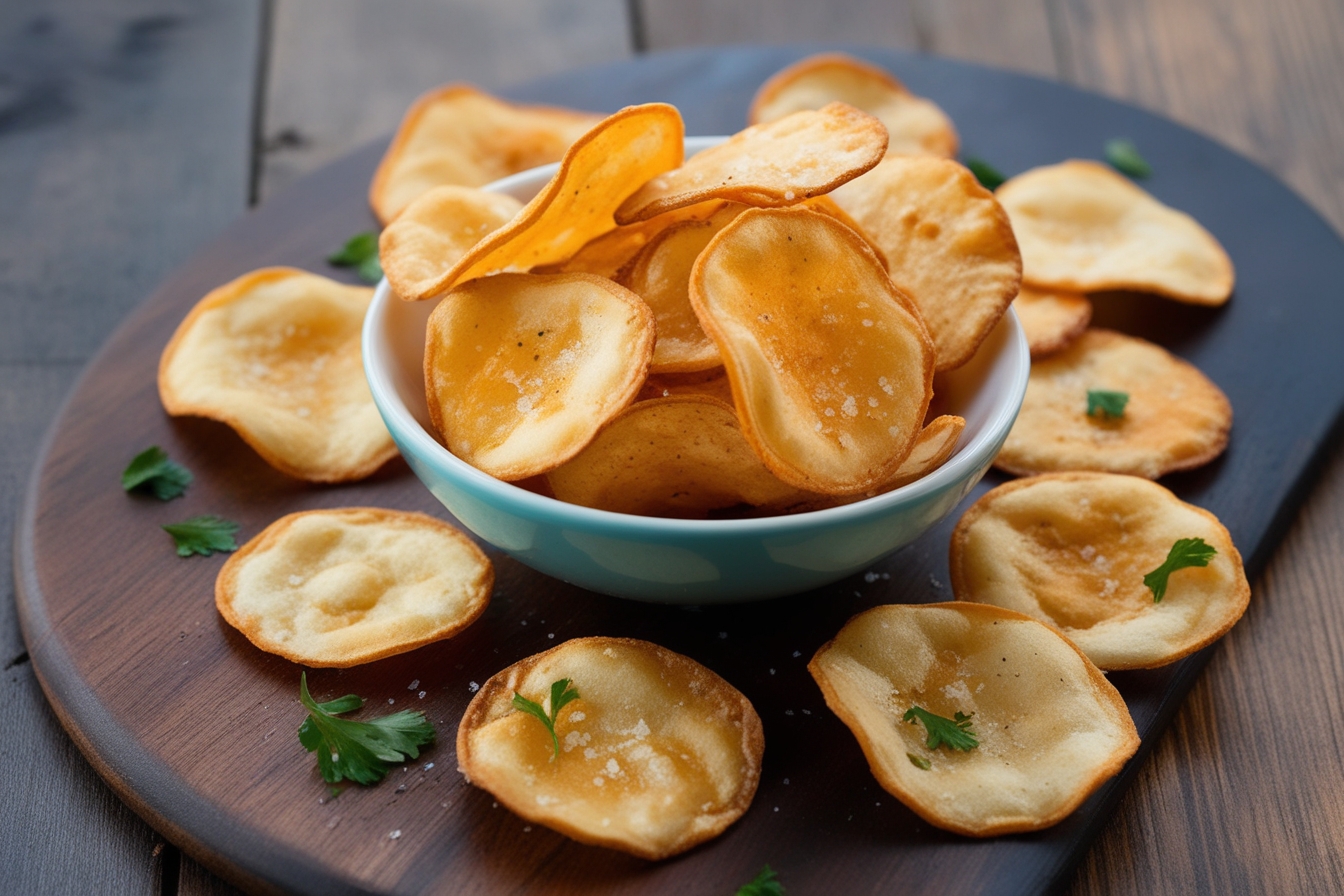
Salt and Vinegar Chips : A Tangy Delight You Can Make at Home

Craving the iconic crunch and tang of salt and vinegar chips, but tired of the store-bought versions? You’re not alone. These zesty snacks have a universal appeal, combining a crispy texture with that unmistakable sour kick. The good news is, you don’t have to rely on store shelves to satisfy your craving. This article will guide you through making homemade salt and vinegar chips that rival (or even beat!) the packaged options.
With simple ingredients and a few easy steps, you can enjoy a healthier, tastier, and more customizable version of this classic snack. Let’s dive into the perfect salt and vinegar chips recipe that will have your taste buds singing!
Why Make Salt and Vinegar Chips at Home?
Before we jump into the recipe, let’s talk about why making these chips at home is a game changer.
- Healthier Alternative: Store-bought chips often contain preservatives, artificial flavorings, and unhealthy oils. When you make them yourself, you control the ingredients.
- Customizable Flavor: Like your chips extra tangy? Want a hint of spice? Making them at home allows you to tweak the recipe to suit your preferences.
- Satisfying Crunch: Homemade chips, when done right, have an unparalleled crunch that’s fresher and more satisfying.
Ingredients for Homemade Salt and Vinegar Chips

The magic of this recipe lies in its simplicity. Here’s what you’ll need:
- Potatoes (Russet or Yukon Gold work best)
- White vinegar or malt vinegar (for that tangy flavor)
- Sea salt (adjust to taste)
- Cooking oil (vegetable oil, sunflower oil, or avocado oil are great options)
- Optional flavor boosters: Garlic powder, black pepper, or smoked paprika
These ingredients are probably already sitting in your pantry, making this a quick and budget-friendly snack.
Step-by-Step Guide to Making Salt and Vinegar Chips
1. Choose the Right Potatoes

For crispy chips, choose starchy potatoes like Russet potatoes. These varieties have less moisture, which results in crispier chips.
2. Slice Thinly and Uniformly

Using a mandoline slicer or a sharp knife, slice your potatoes as thinly as possible. Uniform slices ensure even cooking and avoid soggy chips.
3. Soak in Vinegar Solution

Place the potato slices in a bowl and cover them with a mixture of water and vinegar (1:1 ratio). Let them soak for at least 30 minutes. This step infuses the potatoes with that signature vinegar tang.
Pro tip: For an extra punch, let the potatoes soak overnight in the fridge.
4. Dry the Slices Thoroughly

After soaking, pat the slices dry using a clean kitchen towel or paper towels. Removing excess moisture is key to achieving that crispy texture.
5. Preheat the Oil

In a deep skillet or fryer, heat your cooking oil to 350°F (175°C). A thermometer ensures you maintain the right temperature for frying.
6. Fry in Small Batches

Carefully add a handful of potato slices to the hot oil. Fry them in small batches to prevent overcrowding, which can lower the oil temperature. Cook for about 3-4 minutes or until golden brown and crispy.
7. Drain and Season

Remove the chips from the oil and place them on a plate lined with paper towels to absorb excess oil. While they’re still hot, sprinkle generously with sea salt and toss lightly to coat evenly.
Oven-Baked Salt and Vinegar Chips (Healthier Option)
If frying isn’t your style, try baking your chips.
1. Preheat the Oven
Set your oven to 400°F (200°C) and line a baking sheet with parchment paper.
2. Prepare the Potato Slices
Follow the same steps to slice, soak, and dry the potatoes.
3. Coat with Oil and Vinegar
In a bowl, toss the slices with a tablespoon of vinegar and a drizzle of cooking oil until evenly coated.
4. Arrange and Bake
Spread the slices in a single layer on the baking sheet. Bake for 10-15 minutes on each side, flipping halfway through. Keep an eye on them to prevent burning.
5. Season and Enjoy
Once baked, sprinkle with sea salt and any additional spices you love. Let them cool for a few minutes before digging in.
Air-Fryer Salt and Vinegar Chips (Quick and Easy)
Looking for a faster, healthier method? The air fryer is your best friend.
1. Prep the Potatoes
Slice, soak, and dry your potatoes as instructed above.
2. Preheat the Air Fryer
Set your air fryer to 375°F (190°C).
3. Toss and Cook
Toss the slices with a teaspoon of oil and place them in the air fryer basket in a single layer. Cook for 10-12 minutes, shaking the basket halfway through.
Bonus: The air fryer reduces oil usage while delivering that crispy, golden texture.
Tips for Perfect Salt and Vinegar Chips
- Don’t Skip the Soaking: The vinegar soak is what gives these chips their iconic tangy flavor.
- Experiment with Vinegar Types: White vinegar is classic, but malt vinegar adds a deeper, richer flavor.
- Season While Hot: Adding salt immediately after frying or baking ensures it sticks to the chips.
- Store Properly: To keep your chips crisp, store them in an airtight container once they’ve cooled completely.
Creative Variations for Salt and Vinegar Chips
If you’re feeling adventurous, try these exciting twists:
- Spicy Salt and Vinegar Chips: Add a pinch of cayenne pepper or chili powder to the salt for a spicy kick.
- Garlic and Herb Chips: Sprinkle garlic powder and dried herbs like rosemary or thyme for an elevated flavor.
- Cheesy Chips: Dust with grated Parmesan cheese for a savory twist.
Pairing Ideas for Salt and Vinegar Chips
Salt and vinegar chips are more than just a snack – they’re a versatile side dish too. Here are some pairing ideas:
- Burgers and Sandwiches: Serve alongside juicy burgers or hearty sandwiches for a satisfying crunch.
- Dips: Pair with creamy ranch, spicy hummus, or guacamole for a delightful flavor contrast.
- Soup Companion: Enjoy with a bowl of tomato soup for a comforting meal.
Health Benefits of Homemade Salt and Vinegar Chips
While chips aren’t typically considered “healthy,” making them at home offers some benefits:
- No Artificial Additives: Homemade chips are free from preservatives and artificial flavorings.
- Healthier Oils: You can choose heart-healthy oils like avocado or olive oil.
- Control Over Sodium: Adjust the salt to your dietary needs.
Conclusion
Making salt and vinegar chips at home is easier than you think and incredibly rewarding. Whether you fry, bake, or air fry, you’ll end up with a snack that’s crispy, tangy, and utterly delicious. Plus, you have full control over the ingredients, making them a healthier and more personalized option than store-bought chips.
So, the next time you’re craving a salty snack, skip the bagged chips and try this recipe. Your taste buds will thank you!
If you’re ready to continue exploring the world of intense, flavor-packed dishes, be sure to check out more of our recipes. Embrace the thrill of cooking with bold ingredients and discover new ways to elevate your meals!
- 10 Must-Try Italian Cooking Recipes Loved by Chefs
- Mexican Cooking Recipes for Beginners: Simple Steps to Bold Flavors

- Easy Carnivore Diet Recipes with 5 Ingredients or Less
- Top 15 Carnivore Diet Recipes That Actually Taste Amazing

- 15 Delicious Cuisinart Ice Cream Maker Recipes You Need to Try

- Top 5 Sugar Free Ice Cream Flavors You’ll Love

- Copycat Chick-fil-A Waffle Fries Recipe – Step-by-Step Perfection

- How to Make the Best Bread Crumbs for Your Favorite Dishes
- How to Make the Perfect Ice Cream Cone : Tips, Tricks & Delicious Recipes

- Bluey Cake Tutorial: How to Create the Perfect Themed Cake for Kids’ Parties

- Swordfish Steak Recipe: How to Get It Perfect Every Time
- Princess Cake Recipe: How to Make the Perfect Swedish Prinsesstårta

- Nanalan Cake Recipe: How to Make This Adorable and Nostalgic Treat

- DIY Minecraft Cake: How to Make the Perfect Pixelated Treat

- Authentic Terra Massoud Recipe: A Step-by-Step Guide to Perfection