

Introduction
If you’re a Minecraft fan or planning a Minecraft-themed party, one of the best ways to bring the game to life is by making a real-life Minecraft Cake DIY! In the game, the Minecraft cake recipe features simple ingredients—sugar, wheat, milk, and eggs—and serves as an edible decoration or a fun way to replenish health. The Minecraft cake block is an iconic food item, making it a must-have for any serious Minecraft player. Now, you can create it in your own kitchen!
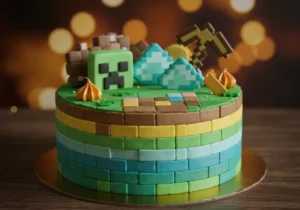
But what makes the Minecraft cake recipe so special? It’s instantly recognizable due to its pixelated, blocky design, featuring a white frosting layer with red pixelated squares on top. This distinctive look makes it the perfect dessert for gaming fans and an exciting centerpiece for a Minecraft birthday party or any fun celebration. Whether you’re baking for kids, teens, or even adult gamers, this cake is a surefire hit that blends creativity with deliciousness.
In this step-by-step guide, you’ll learn exactly how to make a DIY Minecraft cake from scratch—from baking the base to decorating it with pixel-perfect precision. Whether you want a classic Minecraft cake block, a TNT-inspired cake, or a Creeper-themed twist, this guide will help you bring your favorite game to life in the form of a delicious, edible masterpiece. So, let’s get baking and build the ultimate DIY Minecraft cake!
What is a Minecraft Cake? (In-Game and Real-Life Inspiration)
The Minecraft Cake Block: A Sweet Treat in the Game
If you’ve ever played Minecraft, you’re probably familiar with the Minecraft cake block—a delicious-looking item that serves as both a food source and a decorative element in the game. First introduced in Minecraft Beta 1.2 in 2011, this iconic dessert is crafted using three buckets of milk, three units of wheat, two sugar, and one egg. Unlike other food items in the game, which are typically eaten in one bite, the Minecraft cake is unique because it must be placed on a solid surface and eaten slice by slice.
Aside from being a fun way to replenish hunger bars, Minecraft cake has also made its way into various in-game celebrations. It was notably added to celebrate Minecraft’s second anniversary and has since become a symbol of fun, creativity, and community in the gaming world.
Why Minecraft Cake is Popular for Gaming Parties and Birthdays
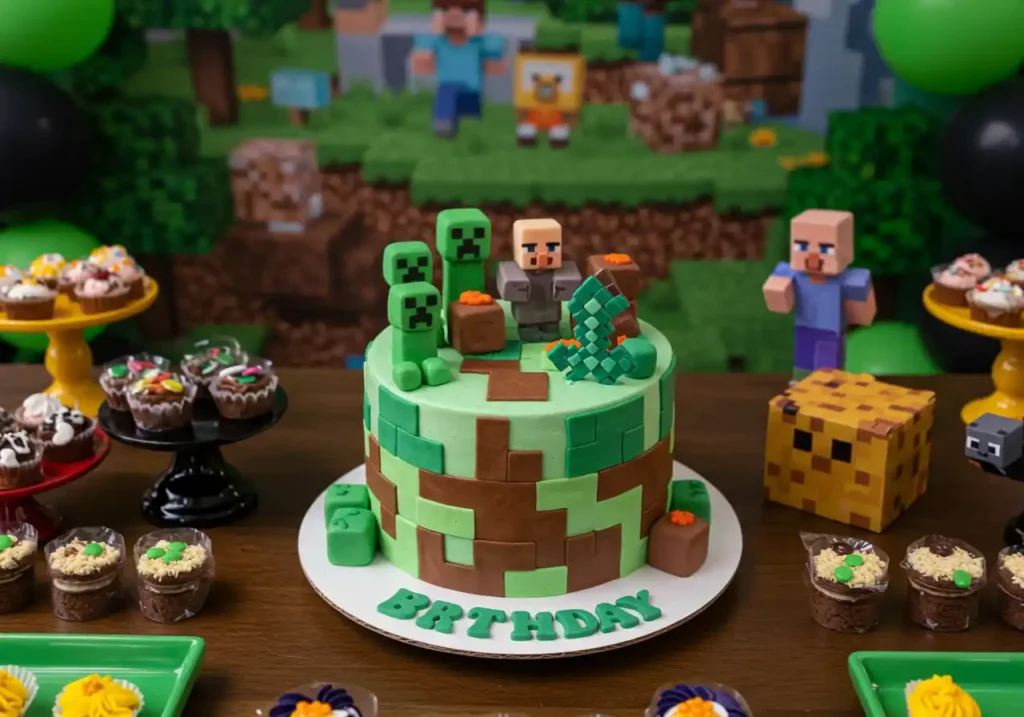
Beyond its role in the game, Minecraft cake has become a real-world favorite—especially for Minecraft-themed birthday parties. Since Minecraft is one of the most popular video games among kids, teens, and even adults, its distinctive blocky aesthetic makes it a perfect theme for party decorations, treats, and of course, birthday cakes.
Here’s why a real-life Minecraft cake is a hit at gaming parties:
- Recognizable Design – The pixelated, block-shaped cake is an eye-catching centerpiece that immediately connects with Minecraft fans.
- Perfect for Themed Parties – From Minecraft decorations to party favors, having an edible version of an in-game item adds an immersive experience.
- Fun and Customizable – While the original Minecraft cake block has a simple white and red design, bakers can get creative by making TNT cakes, Creeper cakes, or even Ender Dragon cakes.
- Great for Any Age – Whether you’re celebrating a kid’s birthday, a game night, or even a fun office party, a Minecraft cake fits any occasion.
How to Recreate the Pixelated Look with Fondant or Frosting
One of the most exciting parts of making a DIY Minecraft cake is bringing the pixelated look to life. Since Minecraft’s entire world is made of blocks, recreating its 8-bit aesthetic in a real-life cake can be a fun baking challenge. There are two main ways to achieve that signature pixelated design:
1. Using Fondant for a Clean, Sharp Pixelated Design
- Fondant is a type of smooth, pliable icing that can be rolled out and cut into small pixel-like squares.
- To mimic the Minecraft cake block, bakers can use red and white fondant to decorate the top.
- For an extra detailed look, fondant can also be used to create Creeper faces, grass blocks, or TNT labels.
- This method is ideal if you want a precise and professional-looking cake.
2. Using Buttercream Frosting for a Softer, Homemade Look
- If working with fondant feels too complicated, buttercream frosting is a great alternative.
- You can use a piping bag to create pixelated patterns or spread colored frosting with a spatula for a handmade, artistic effect.
- Red frosting dots on a smooth white buttercream base can easily resemble the classic Minecraft cake design.
- This method works well for home bakers who prefer a delicious, creamy finish.
No matter which technique you choose, the goal is to make your DIY Minecraft cake as close to the in-game design as possible while keeping it fun, delicious, and party-ready!
Ingredients & Tools Needed for a DIY Minecraft Cake
Before diving into the step-by-step baking process, it’s essential to gather all the ingredients and tools you’ll need to create a perfectly pixelated Minecraft cake. Whether you’re an experienced baker or a beginner, having everything prepared in advance will make the process smoother and more enjoyable.
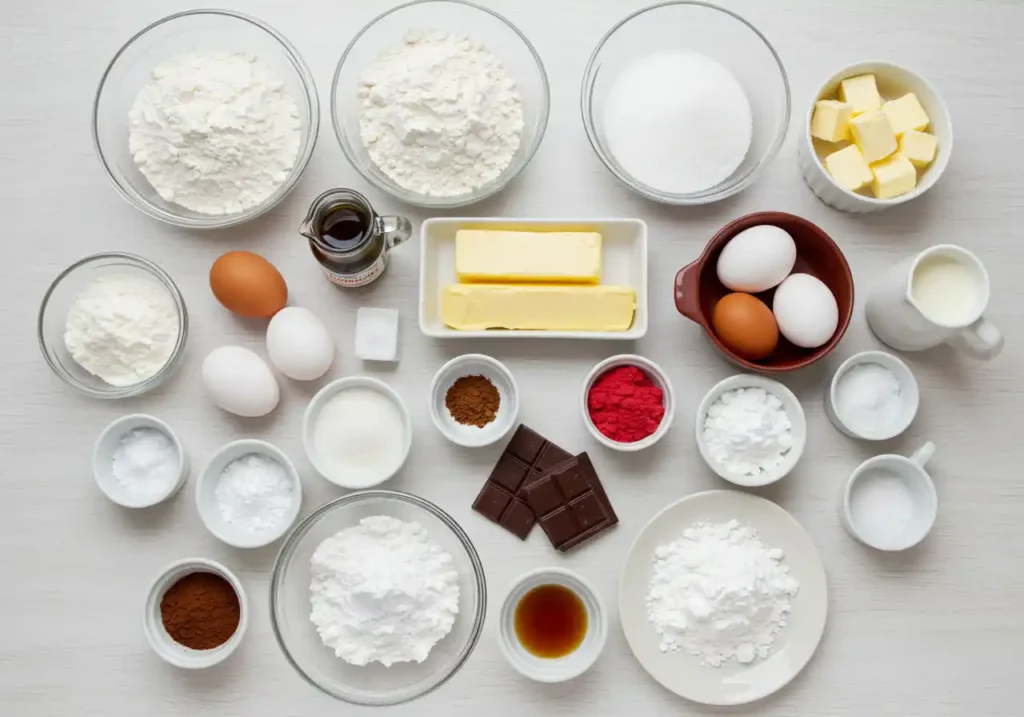
Ingredients for the Cake Base
To create a moist, fluffy, and delicious DIY Minecraft cake, you’ll need the following basic cake ingredients:
Dry Ingredients
- 2 ½ cups all-purpose flour – The foundation of your cake, providing structure.
- 2 ½ teaspoons baking powder – Helps the cake rise and become light and airy.
- ½ teaspoon salt – Enhances the flavors and balances the sweetness.
Wet Ingredients
- 1 cup unsalted butter (softened) – Adds richness and moisture.
- 2 cups granulated sugar – Sweetens the cake while contributing to its fluffy texture.
- 4 large eggs – Helps bind the ingredients together and adds stability.
- 1 tablespoon vanilla extract – Gives the cake a warm, sweet aroma and flavor.
- 1 cup whole milk – Ensures a tender crumb and smooth batter.
Optional Flavor Variations:
- Substitute cocoa powder (½ cup) for some flour to make a chocolate Minecraft cake.
- Add almond extract for a nutty twist.
- Use buttermilk instead of regular milk for a slightly tangy and ultra-moist cake.
Frosting & Decoration Supplies
The signature pixelated look of a Minecraft cake comes from carefully crafted decorations, which can be achieved using fondant, buttercream, and food coloring. Here’s what you’ll need:
Frosting Base:
- 2 cups unsalted butter (softened) – The main ingredient for a rich and creamy frosting.
- 4 cups powdered sugar – Sweetens and stabilizes the frosting.
- 2 teaspoons vanilla extract – Adds flavor to the buttercream.
- 2–4 tablespoons heavy cream or milk – Helps achieve the perfect spreadable consistency.
Decorations:
- White fondant or buttercream – To mimic the cake’s white frosting layer in the game.
- Red fondant or red food coloring – For the pixelated red squares on top of the cake.
- Chocolate squares or brown fondant – To create the block-like edges of the cake.
- Green fondant or green food coloring (optional) – If making a grass-block Minecraft cake variation.
Food Coloring Options:
If you prefer buttercream over fondant, you can use food coloring gels to dye frosting:
- Red gel food coloring – For the pixel details on top.
- Brown gel food coloring – To darken the edges of the cake.
- Green gel food coloring – If making a grass block cake version.
Tools Needed for a Perfect DIY Minecraft Cake
Having the right baking tools on hand will make assembling and decorating the cake much easier. Here are the essential tools:
Baking Essentials:
- 8-inch or 9-inch square cake pans – Minecraft cakes are blocky in shape, so using square pans is crucial.
- Mixing bowls – For combining wet and dry ingredients separately.
- Electric mixer or whisk – Helps achieve a smooth, lump-free batter.
- Measuring cups and spoons – Ensures accurate measurements for baking precision.
Decorating Tools:
- Rolling pin – If using fondant, a rolling pin will help flatten it for precise decoration.
- Piping bags and tips – If decorating with buttercream frosting, piping bags make it easier to add details.
- Offset spatula – Ideal for spreading frosting smoothly on the cake.
- Bench scraper – Helps create sharp, clean edges on a buttercream-frosted cake.
- Fondant cutter or sharp knife – Useful for cutting fondant into pixel-like squares.
- Toothpicks or cake dowels (optional) – For added stability when stacking multiple layers.
Pro Tips for Preparation:
- Pre-measure ingredients to save time and avoid missing anything.
- Chill the cake layers before frosting to prevent crumbs from mixing into the icing.
- Use parchment paper in the cake pans for easy removal.
- If working with fondant, keep it covered when not in use to prevent drying out.
By ensuring you have all the necessary ingredients and tools ready, you’ll set yourself up for a smooth, stress-free baking experience while creating the ultimate DIY Minecraft cake!
Step-by-Step Guide: How to Make a Minecraft Cake Recipe
Now that we have all the ingredients and tools ready, it’s time to start baking! Follow this step-by-step guide to create a perfectly pixelated Minecraft cake that will impress both gamers and food lovers alike.
Step 1: Bake the Cake Base
The foundation of your Minecraft cake recipe starts with a delicious, fluffy cake. Whether you prefer vanilla, chocolate, or a flavored variation, the key is to use square cake pans to achieve the signature blocky appearance.
Instructions:
- Preheat your oven to 350°F (175°C) and grease your 8-inch or 9-inch square cake pans with butter or non-stick spray.
- Prepare the cake batter:
- In a large mixing bowl, whisk together the dry ingredients (flour, baking powder, and salt).
- In a separate bowl, beat the butter and sugar until light and fluffy.
- Add the eggs one at a time, followed by vanilla extract.
- Gradually add the dry ingredients and milk, alternating between the two, until fully combined.
- Pour the batter evenly into the greased square cake pans.
- Bake for 30–35 minutes, or until a toothpick inserted in the center comes out clean.
- Cool the cakes completely before decorating to prevent the frosting from melting.
Pro Tip:
- If you want a chocolate Minecraft cake, substitute ½ cup of flour with ½ cup of cocoa powder for a rich, chocolatey flavor.
Step 2: Prepare the Frosting & Decorations
Now, let’s mix the frosting and cut the fondant to create the pixelated details for your cake.
Making the Buttercream Frosting:
- In a large bowl, beat 2 cups softened butter until smooth and creamy.
- Gradually add 4 cups powdered sugar, mixing well after each addition.
- Stir in 2 teaspoons vanilla extract for flavor.
- Add 2–4 tablespoons heavy cream or milk and beat until the frosting is smooth and fluffy.
- If using food coloring, divide the frosting and mix in colors for decoration.
Cutting the Fondant for Pixelated Details:
- Roll out the white fondant and cut it into squares to create the frosting-like top.
- Roll out the red fondant and cut small squares to resemble the pixelated red cherries on the in-game Minecraft cake.
- If making a grass block cake, roll out green fondant and cut it into strips to place along the sides.
Alternative Decoration Idea:
- Instead of fondant, you can pipe colored buttercream frosting in a pixelated pattern using a piping bag.
Step 3: Assemble & Decorate Your Minecraft Cake
Now comes the most exciting part—bringing your Minecraft cake recipe to life!
Assembling the Cake:
- If making a layered cake, trim the tops of the cake layers to make them flat and even.
- Place the first cake layer on a cake board or plate.
- Spread a generous layer of buttercream frosting evenly over the top.
- Place the second cake layer on top and lightly press it down.
Frosting the Cake:
- Use an offset spatula to spread a thin crumb coat (a light layer of frosting) over the entire cake.
- Let it chill in the fridge for 15–20 minutes to set.
- Apply a final layer of buttercream frosting and smooth it out using a bench scraper.
Adding the Pixelated Decorations:
- Place the white fondant squares on top of the cake to resemble the in-game cake’s frosting.
- Arrange the red fondant squares in a pixelated pattern to mimic the cherries.
- If using chocolate squares or brown fondant, place them around the edges to create a blocky appearance.
- Optional: Sprinkle edible pixel sprinkles or use a piping bag to add extra detailing.
Final Touches & Serving Suggestions
🎉 Congratulations! You’ve successfully made your own DIY Minecraft cake! Here are some final tips for serving and displaying:
- Chill the cake for 30 minutes before slicing to get clean, sharp edges.
- Pair it with Minecraft-themed party treats like pixel cookies or TNT cupcakes.
- Light up candles and surprise a Minecraft fan with their dream birthday cake!
This step-by-step guide ensures that your Minecraft Cake DIY not only looks pixel-perfect but also tastes amazing.
Creative Minecraft Cake Variations & Decoration Ideas
Now that you’ve mastered the classic Minecraft cake, why not take your creativity to the next level? There are countless ways to make a Minecraft-themed cake, whether you want to feature a Creeper, TNT block, or a no-fondant version. Below are some fun and unique ideas to personalize your cake while still keeping that pixelated Minecraft aesthetic.
Minecraft Creeper Cake – A Must for Creeper Fans!
The Creeper is one of the most iconic characters in Minecraft, and turning it into a cake is a fantastic way to surprise any Minecraft lover. This cake features a green base with a signature black pixelated Creeper face.
How to Make a Minecraft Creeper Cake:
- Bake a square cake (vanilla, chocolate, or even matcha for a natural green hue).
- Cover the entire cake with green fondant to resemble the Creeper’s signature color.
- Roll out black fondant and cut out pixelated square shapes to create the Creeper’s eyes and mouth.
- Carefully place the black fondant squares onto the cake in the shape of a Creeper’s face.
- Optional: Add different shades of green fondant squares to give the cake more of a blocky, pixelated effect.
🎉 Pro Tip: If you don’t want to use fondant, you can pipe green buttercream frosting using a square tip and then use chocolate squares or black buttercream for the Creeper’s face!
Minecraft TNT Cake – A Dynamite Party Treat!
If you’re looking for a bold and explosive cake design, a Minecraft TNT cake is a great choice! This design mimics the red and white pixelated TNT block that players use in the game.
How to Make a Minecraft TNT Cake:
- Bake a square or rectangular cake and cover it with red fondant to create the TNT block base.
- Roll out white fondant and cut it into thin strips, then layer them on the top and sides to create the TNT pixel pattern.
- Use black edible food markers or black fondant to write “TNT” across the middle of the cake.
- Add extra pixel details by placing dark red and lighter red fondant squares around the cake for a more authentic block look.
- For a fun touch, you can place sparkler candles on top to create a real TNT effect when lit!
🎉 Pro Tip: If you prefer not to use fondant, use a red buttercream base and pipe white lines with frosting to create the TNT block design.
No-Fondant Minecraft Cake – Easy & Delicious!
Not a fan of fondant? No worries! You can still create a Minecraft-themed cake using buttercream frosting and piping techniques.
How to Make a No-Fondant Minecraft Cake:
- Bake a square cake (chocolate or vanilla works best).
- Use colored buttercream frosting to achieve a pixelated design:
- Green for a Creeper or grass block.
- Brown for a dirt block.
- Red and white for a TNT block.
- Fill a piping bag with different shades of frosting and use a square piping tip to create a pixelated effect.
- Carefully pipe small squares in different shades of green, red, or brown, depending on the block you are recreating.
- For extra detail, use chocolate squares, crushed Oreos, or candy pieces to add texture.
🎉 Pro Tip: This method is perfect for beginners and those who want a softer, creamier cake texture without the chewiness of fondant.
Bonus Minecraft Cake Ideas for Extra Creativity
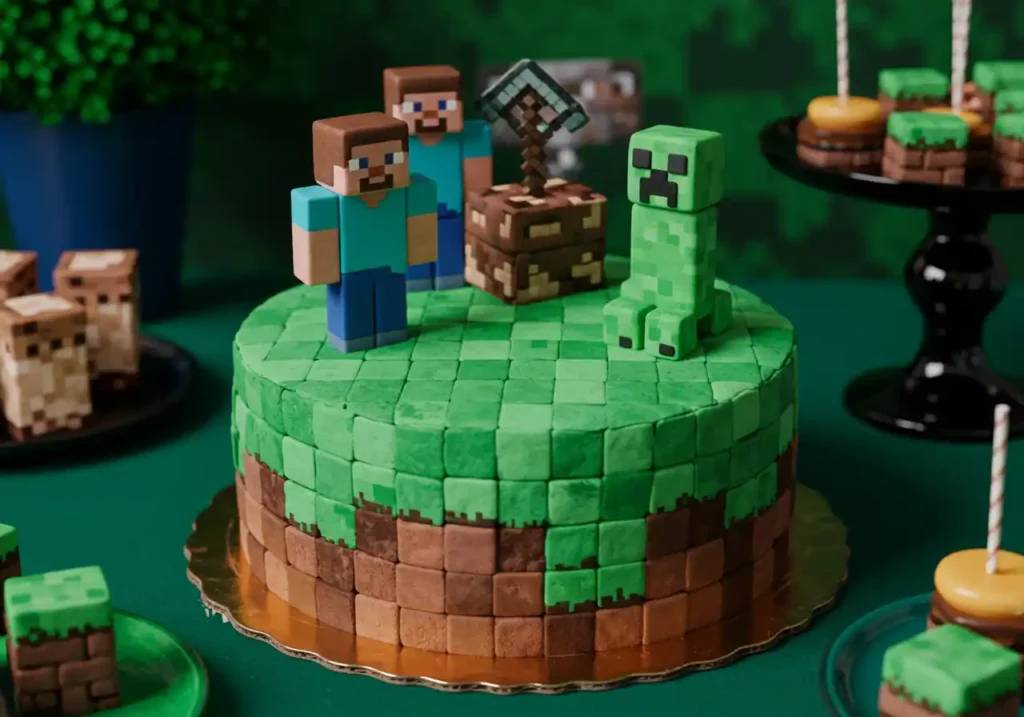
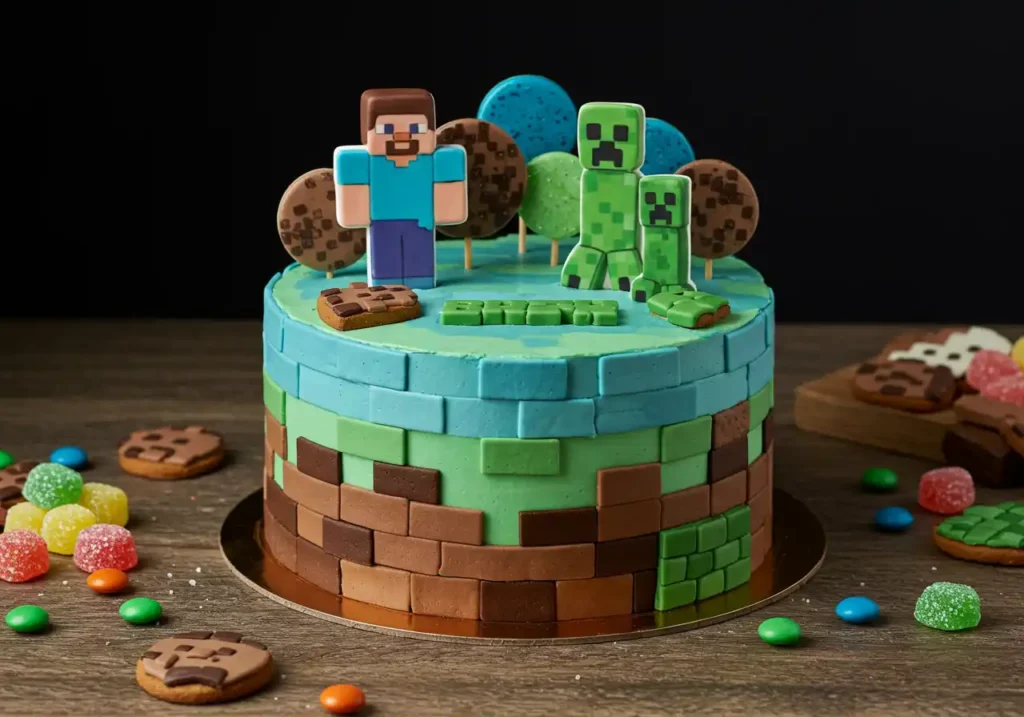
- Minecraft Grass Block Cake: Use green frosting on top and brown sides to resemble a grass block. Sprinkle crushed graham crackers on the bottom for a dirt-like effect.
- Minecraft Pickaxe Cake: Decorate a rectangular cake with a pixelated pickaxe design using blue and brown frosting.
- Minecraft Character Cake: Create a cake with Steve, Alex, or Enderman faces using buttercream or fondant squares.
No matter which variation you choose, these Minecraft cake designs will make your gaming party extra special and fun!
Pro Tips for Making the Best Minecraft Cake
Creating a perfect Minecraft cake recipe requires more than just baking skills—it’s all about the fine details and techniques that bring your pixelated masterpiece to life. Whether you’re aiming for sharp edges, smooth fondant, or a flawless design that lasts, these pro tips will help you achieve bakery-level results at home.
How to Get Sharp Edges on Your Pixelated Cake
One of the key features of a Minecraft cake is its blocky, pixelated shape, which means you’ll want to achieve clean, sharp edges rather than rounded corners. Here’s how to do it:
1. Use a Square Cake Pan
- A square or rectangular pan helps you achieve the classic block shape from the start.
- Avoid using round pans, as trimming them into a square can lead to uneven edges.
2. Chill Your Cake Before Frosting
- Once your cake has cooled completely, wrap it in plastic wrap and refrigerate it for at least 1-2 hours.
- A cold cake is firmer, making it easier to cut and frost without crumbling.
3. Apply a Crumb Coat
- A thin layer of buttercream frosting (crumb coat) seals in crumbs and creates a smooth surface for decorating.
- After applying the crumb coat, chill the cake for 30 minutes before adding the final layer of frosting or fondant.
4. Use a Bench Scraper for Smooth Sides
- For a clean finish, use a bench scraper or offset spatula to smooth out the buttercream and create precise edges.
- If using fondant, gently press the edges with a fondant smoother to define the block shape.
🎉 Pro Tip: If you’re aiming for extra-sharp edges, try using the acrylic disk method—place two acrylic disks on the top and bottom of your cake, then smooth the buttercream between them before removing.
Best Fondant Brands for Smooth and Easy Decorating
If you want a professional look, choosing the right fondant makes a huge difference. Some brands are too stiff, sticky, or dry out quickly, which can make decorating frustrating. Below are the best fondant options for flawless Minecraft cakes:
1. Satin Ice Fondant
- Great for beginners and professionals alike.
- Smooth texture and easy to roll out.
- Comes in pre-colored shades (great for red, green, and brown blocks).
2. Wilton Decorator Preferred Fondant
- Affordable and widely available.
- Slightly firmer texture, making it great for sharp edges.
- Ideal for small decorations like pixel squares.
3. Renshaw Ready-to-Roll Fondant
- Used by many professional cake decorators.
- Flexible and less prone to cracking.
- Best for creating seamless fondant finishes.
🎉 Pro Tip: To prevent fondant from drying out, knead it well and lightly coat it with vegetable shortening before rolling it out.
How to Store and Transport Your Minecraft Cake Without Smudging the Design
Once your Minecraft cake is decorated, the last thing you want is for it to smudge, crack, or melt before serving. Proper storage and transportation are key to keeping it looking perfect.
1. Storing Your Minecraft Cake
- If unfrosted, wrap the cake in plastic wrap and store it at room temperature for up to 2 days or in the fridge for up to 5 days.
- Once decorated with buttercream, store in an airtight container in the fridge to prevent drying out.
- If covered in fondant, avoid storing it in the fridge for long periods, as moisture can cause it to become sticky—keep it in a cool, dry place instead.
2. Transporting Your Minecraft Cake Safely
- Place the cake on a sturdy cake board that’s slightly larger than the cake itself.
- Use a cake box with enough room so the cake doesn’t touch the sides.
- Keep the cake flat during transport—placing it on a car seat can make it tilt! Instead, put it on a flat surface like the trunk or floor.
- If it’s a hot day, turn on the air conditioning or place frozen gel packs near the cake box to keep the frosting from melting.
🎉 Pro Tip: If traveling long distances, bring extra frosting, fondant pieces, or decorations for quick touch-ups in case of minor mishaps.
Final Thoughts
By following these pro cake-making tips, you’ll be able to create a Minecraft cake that looks just like the in-game block—sharp, pixelated, and totally Instagram-worthy! Whether you’re making a classic Minecraft cake block, a Creeper design, or a Minecraft birthday cake, these techniques will help you achieve a flawless finish every time.
Frequently Asked Questions (FAQs)
Creating a Minecraft cake recipe can raise plenty of questions, especially if it’s your first time making one. Here are some of the most common questions that may help clarify your doubts and provide additional tips for making the perfect pixelated treat!
1. How Do I Get the Pixelated Look on My Minecraft Cake?
Achieving the signature pixelated look of a Minecraft cake is all about precision and square shapes. Here are some tips to get it just right:
- Use square cake pans: For a blocky look, start with square or rectangular cake pans. This will give you the clean edges necessary for a pixelated design.
- Fondant or frosting squares: Cut your fondant into small square shapes that match the Minecraft block’s pixelated texture. You can also use buttercream and a piping technique to create squares of frosting that resemble the game’s iconic look.
- Layering technique: Stack the cake in layers and frost it with smooth, flat surfaces to give the illusion of a pixelated block. The more accurate and uniform your squares, the closer you’ll get to the look you’re aiming for.
2. Can I Make a Minecraft Cake Recipe Without Fondant?
Yes! While fondant provides a smooth and easy way to get that clean, pixelated finish, there are other methods you can use to create a Minecraft cake without fondant:
- Minecraft Cake recipe buttercream piping: For a more simple design, you can use piping bags to create small, square pixel shapes with buttercream. You can achieve a pixelated effect by carefully piping squares with different colors for a Minecraft-inspired look.
- Minecraft Cake recipe decorations: You can also use edible decorations like chocolate squares or fondant pieces to create a similar effect. Just use colored frosting to add the final touches.
Using buttercream for decoration will give your cake a more textured look, but it can be a great option for those who prefer to avoid fondant or need a quicker decorating method.
3. How Can I Make the Minecraft birthday cake More Detailed?
If you want to go above and beyond with your Minecraft birthday cake, here are some ideas to make it stand out:
- Edible decorations: Consider using edible pixel sprinkles or sugar cubes to add extra detail and dimension to your design. This works especially well with Creeper cakes or TNT cakes, where you want to bring out the sharp details.
- Chocolate decorations: Use melted chocolate to pipe small square details on your cake or to create Minecraft mob faces like the Creeper or Enderman.
- Minecraft-themed cake toppers: Use Minecraft action figures or edible cake toppers to place on top of your cake. This will give your creation that added authenticity and fun factor.
4. Can I Make a Minecraft Cake Ahead of Time?
Yes, you can absolutely make a Minecraft cake recipe in advance! Here’s how you can prepare it:
- Cake: Bake the cake layers in advance and store them in an airtight container at room temperature for up to 2 days. Alternatively, you can freeze the cake layers for up to 3 months. Be sure to wrap the layers tightly in plastic wrap to preserve their freshness.
- Frosting & Fondant: You can also make your frosting and fondant ahead of time and store them in airtight containers in the fridge. Just make sure to bring them to room temperature before decorating.
- Assembly: It’s best to assemble and decorate the cake the day you plan to serve it, so it’s fresh. However, you can apply the crumb coat and chill the cake overnight before the final decorating touches.
5. How Do I Keep the Cake Fresh for a Party?
If you’re making your Minecraft cake for a party and want to ensure it stays fresh and picture-perfect:
- Store it properly: Keep your cake in a cool, dry place, and if it has fondant, avoid refrigerating it as fondant can become sticky. If you’re using buttercream, storing the cake in the fridge works fine.
- Avoid direct sunlight: Keep the cake away from direct sunlight, as this can cause the frosting to melt or become too soft.
- Cover the cake: If you need to store it for a few hours before the party, cover the cake with a cake box or plastic wrap to prevent dust or debris from sticking to the design.
6. Can I Make a Minecraft Cake for a Different Occasion Other Than a Birthday?
Absolutely! While Minecraft cakes are a popular choice for birthdays, they’re versatile enough for other occasions:
- Minecraft-themed parties: Whether it’s a party for a gamer or a fan of the Minecraft universe, the cake will be a hit at any celebration.
- Game nights: Hosting a gaming night with friends or family? A Minecraft cake is the perfect treat to serve alongside your gaming session.
- Holidays: Minecraft cakes can also be adapted for special holidays—decorate your cake with festive Minecraft designs, such as Minecraft pumpkins for Halloween or Minecraft hearts for Valentine’s Day.
🎉 Pro Tip: Consider customizing your Minecraft birthday cake to reflect the personality of the person you’re making it for. Whether it’s based on their favorite Minecraft mob, biome, or item, tailoring it to their tastes will make the cake even more special!
Final Thoughts :
Whether you’re a Minecraft fan, a baker, or just looking to try something fun and creative, making a Minecraft birthday cake is a fantastic way to celebrate the game’s unique aesthetic. With these FAQs, you now have a clearer understanding of the techniques, variations, and ideas to make your cake truly stand out. Happy baking, and don’t forget to share your Minecraft cake photos with us! 🧁🎮
Conclusion: Bringing Your Minecraft Cake to Life
Creating a Minecraft cake recipe is not only about baking—it’s about bringing the pixelated world of Minecraft to life through your own creativity and craftsmanship. From the first step of baking the cake to the final touches of frosting and decoration, the process of making a DIY Minecraft cake offers endless opportunities to experiment and make something truly unique. Whether you’re making the iconic Minecraft birthday cake, a Creeper face, or a TNT block, each variation adds its own fun twist to the experience.
A Fun & Creative Baking Experience
DIY Minecraft Cake is an adventure in itself. It’s a chance to unleash your creativity, experiment with different frosting techniques, and design a cake that perfectly fits your Minecraft-themed party or birthday celebration. Whether you’re baking for a Minecraft fan or simply looking for a creative way to showcase your love for the game, DIY Minecraft Cake offers endless exciting possibilities. It’s a hands-on project that lets you play with your food in the best way possible—just like the game itself!
Explore Different Minecraft Cake Variations
The world of Minecraft offers countless cake variations to try. While the classic Minecraft Cake recipe block is a fan favorite, don’t hesitate to get creative and try new designs like the Creeper cake, TNT cake, or even a cake inspired by Minecraft mobs or landscapes. The ability to transform simple ingredients into an interactive, themed treat makes the whole process even more fun. Plus, with a Minecraft Cake recipe, you can use different textures, colors, and cake flavors to personalize each cake and make it your own.
We Want to See Your Creations!
Now that you’re equipped with the step-by-step guide to making the perfect Minecraft cake recipe, it’s time to get baking! Whether you’re hosting a Minecraft-themed birthday party, making a fun Minecraft cake for friends, or just experimenting in the kitchen, we’d love to see your DIY creations. Share pictures of your cakes in the comments section below, and feel free to ask any questions if you need further guidance or want to share your creative tweaks. Don’t forget to tag us on social media with your Minecraft cake photos so we can celebrate your awesome creations together!
🎉 Get Baking and Have Fun
Now, it’s your turn to bring the world of Minecraft to life with your very own cake. Happy baking, and may your cake be as pixel-perfect as the game itself!
Discover Even More Delicious Recipes to Try!
Looking for more mouthwatering ideas that go beyond Minecraft-themed treats? You’re in the right place! Whether you’re craving savory dishes, indulgent desserts, or refreshing beverages, we have a wide variety of recipes that will satisfy any taste. From quick and easy meals to elaborate show-stopping creations, there’s something for every occasion. Scroll down to explore a diverse collection of recipes with vibrant images and detailed descriptions, and get ready to add some new favorites to your culinary repertoire. Happy cooking! 🍽️
- 10 Must-Try Italian Cooking Recipes Loved by Chefs
- Mexican Cooking Recipes for Beginners: Simple Steps to Bold Flavors
- Easy Carnivore Diet Recipes with 5 Ingredients or Less
- Top 15 Carnivore Diet Recipes That Actually Taste Amazing

- 15 Delicious Cuisinart Ice Cream Maker Recipes You Need to Try
- Top 5 Sugar Free Ice Cream Flavors You’ll Love
- Copycat Chick-fil-A Waffle Fries Recipe – Step-by-Step Perfection
- How to Make the Best Bread Crumbs for Your Favorite Dishes
- How to Make the Perfect Ice Cream Cone : Tips, Tricks & Delicious Recipes
- Bluey Cake Tutorial: How to Create the Perfect Themed Cake for Kids’ Parties
- Swordfish Steak Recipe: How to Get It Perfect Every Time
- Princess Cake Recipe: How to Make the Perfect Swedish Prinsesstårta
- Nanalan Cake Recipe: How to Make This Adorable and Nostalgic Treat
- DIY Minecraft Cake: How to Make the Perfect Pixelated Treat
- Authentic Terra Massoud Recipe: A Step-by-Step Guide to Perfection

- How to Make Chocolate Gravy from Scratch Quick and Easy Guide
- How to Make the Perfect Tini Mac and Cheese – Step-by-Step Guide
- Taste of Home Recipes: 25 Comforting Dishes That Feel Like a Warm Hug
- Easy Ways to Customize Your Madeleine using cream cake
- How to Make Gordon Ramsay’s Chocolate Cream Cheese Pound Cake
- Green Pumpkin Cooking Guide: 10+ Asian Recipes for Savory Delights